Thursday, October 28, 2010

Halloween Mani: "I Wanna Suck Your Blood"

Vampire teeth and blood...is that even considered to be a part of Halloween? Not sure, but since those things are scary, why not? 
You might be asking, what's with the falsies? Well, the other day, I finally decided to chop my nails off. They were tearing at the edges, breaking one by one...I admit I've been lazy to clean my nails properly and not to mention moisturize at all because my cuticles look hideous! Oh, and should I even speak of yellow, stained nails? (I've been really bad to them --tisk.tisk)

So now, my plan is to not wear polish for a while and let my nails get some fresh air and let them grow healthy again. And in the mean time, I'll just do my nail arts, swatches and what-nots on falsies just like these.

Now, on to the nail art...
Blood drops and splater everywhere and fangs on the second nail.

 
(pic above are the products used)

1. Essie Licorice as the base color (don't forget your base coat if applying on real nails).
2. Color Club Yachty Yachty Yada for the gum line.
3. White Acrylic Paint & A small detail brush to draw the teeth and fangs.
4. Sally Hansen Rapid Red for the blood (scattered in all directions).

Hope you liked it! I'm really wishing they were on my nails right now though :(.
♥, Kristine

Tuesday, October 26, 2010

Halloween Nails

I did this mani a few weeks back but I somehow lost the pictures, but thank God I finally found them trying to organize all the pictures on our computer.

Thumb: Spider web; Pointer: simple spider; Middle: "Boo!" Ring: Random dots (which ended up looking like some kind of scary face =)); Pinky: Bats


Base Coat: OPI Nail Envy
Base Color: Orly White Tips
Design: Black acrylic paint
Top Coat: Seche Vite

♥, Kristine

Monday, October 25, 2010

Giveaway Winners

And the winners for the Hello Kitty water decals are:
ANSTAH from Nailstah
Asami from Nails by Asami
Kelly from Konad and Polish

Congratulations Ladies!
You'll be recieving an email from me shortly; please respond within 24 hours or another entry will be chosen.

Thanks everyone who participated! I always have fun having these giveaways and I'm looking forward to more in the future!

Breast Cancer Awareness Month

Hi gals! I know I'm a little late for this but it's still the month of October and it's still within the time frame ;) I don't know anyone who's ever had breast cancer but my mother had cervical cancer and this is my reminder and to be aware to always get check ups when I need to for prevention of cancer.

Re: Hello Kitty Water decals giveaway--I'm almost done tallying all the entries, I hope to announce the winners in another post tonight so stay tuned...


Base Coat: OPI Nail Envy
French Tip: NYX Hot Pink & NYX Ink Nail Art in Black & Silver Glitter
Ring Finger: Essie Licorice, NYX Hot Pink
Top Coat: OPI RapiDry Top Coat

♥, Kristine

Wednesday, October 13, 2010

Hello, Hello Kitty: Tutorial & Giveaway (pic heavy) [CLOSED]

Yes, you read it right. This post is a tutorial and a GIVEAWAY! Yay! So read on...

With all the hype today with "Hello Kitty" this, and "Hello Kitty" that, I was subdued by it's cuteness and couldn't resist on doing a mani, a tutorial, and a giveaway (my second one!) for all you lovely readers. =)


Base Coat: Nail Envy
Base Color: NYX Fierce Purple
Nail Art: Hello Kitty Nail Art Stickers
Top Coat: Seche Vite

The application for this mani was sssooooo easy, I'd like to show you how I did it...

Prep your nails prior to the fun part: on clean nails, 
- apply your base coat; allow to dry
- apply your base color; allow to dry

and then the fun part...
These are the nail art stickers/tatoos I used.

I selected the image I wanted to use

Using  tweezers (or your fingers--it doesn't matter),
I dipped the image into water for 5-10 seconds.

Remove from water and slide the image off the paper
backing.


Apply carefully on desired nail(s) and gently force out the
water between the sticker/tatoo and you nail. Add your
favorite top coat and you're good to go!

See how super easy that was!
So easy that I'd like to give THREE lucky followers a chance to win
ONE of these Hello Kitty Nail Art Stickers.

-(1 winner = 1 Nail Art Stickers Pack)
-You get to choose which one you want.

-Winners will be chosen through random.org.

(*Images are clickable)


Here are the rules:
- You have to be a follower; New readers welcomed
- Blog (one entry); tweet (one entry)
- Tell me one fun fact (anything! sky's the limit!) (one entry)
- Open to all!
- Giveaway ends Sunday, Oct. 24 11:59pm HST

If for any reason, the winner(s) do not respond within 24hrs after being contacted, I will choose another winner through random.org.

DON'T FORGET TO FILL OUT THE FORM BELOW =)


GOOD LUCK!
♥, Kristine


Tuesday, October 5, 2010

Halloween- Inspired by...

Hello ladies...I have nails here inspired by Asami on her "Pepo the Halloween Spider". Super cute and super easy design. If you don't know Asami yet, you need to check her blog. she has some pretty neat tips and tutorials that are easy to follow. I need to also mention that if it weren't for Tara at For Your Nails Only I wouldn't have been inspired to do free hand nail art. Tara has tremendous talent when it comes to true nail art...you need to check her out; her designs never ceases to amaze me! So on to the design...

This is my take on Asami's Pepo the Halloween Spider. I have no idea what lured me to do black and red stripes but I'm starting to regret it doing it now. Ha! it's one of those things where "you should have left it the way it was but you insisted it needed something more".


Base Coat: Nail Envy
Base Color: Orly White Tips
Design: NYX Ink Nail Art in Black & Red Glitter
Top Coat: Seche Vite

Note: Sorry for the poor quality photo. I only had my phone at hand. 

I also have to apologize for not posting for a few weeks. I've just been super swamped. 
I started an online class in mid September and just recently started a non-credit class two weeks ago which I have to say, is kicking my butt! It's only once a week but the class is 7 hours long! Talk about your brains being fried! To top all that off, I've been helping out with parties that involve me doing party invitations, party favors, tags, etc...
Yep, I had my plate really full lately.
So I hope you understand why I've been MIA (missing in action).
Until next time, Thanks for looking! =)

♥, Kristine


Friday, September 17, 2010

For the love of DS Glamour

I've got another blue for those who love blue as much as I do! I love OPI DS Glamour so much, I couldn't resist on using it for this design. A simple chevron french; blue on blue with a touch of glitter.
Indoor, Flash
Indoor, Natural light, no flash
Indoor, Flash

Base Coat: OPI Nail Envy
Base Color: NYX Ink Heart
Tip Design: OPI DS Glamour & NYX Ink Nail Art in Crystal Glitter
Top Coat: OPI RapiDry TopCoat

Note: NYX Ink Heart is a creme finish but because I used OPI RapiDry when my mani wasn't completely dry yet, the brush picked up some of the holo glitters from DS Glamour making Ink Heart look like a glitter/shimmer polish which sorta gave it a nice effect on the overall mani.

**Images are clickable**

Have a great weekend everyone!
♥, Kristine


Monday, September 13, 2010

Guest NOTD: Gold and Leopard

Here's a quick post. I have a guest nail of the day; my niece Kyra (3yrs) who requested me to do her nails. I thought it'd be cute to do a leopard print on her since her mommy's a big fan of the pattern.


Base Coat: Nail Envy
Base Color: OPI Bling Dynasty (2 Coats)
Konad IP m57 w/ Essie Licorice 
Top Coat: Seche Vite

Little fingers are fun to polish...especially when they're willing to cooperate. =)
Isn't it cute? Love it!

♥, Kristine

Saturday, September 11, 2010

Pure Ice Kiss Me Here, m57

Happy September everyone! How's the weather in your area? It's weird as always here in Hawaii...it's cold, then hot and humid, then rainy, then cold and rainy. If I can't control the weather, then it's at least a blessing that I can control what my mani will be like =)

Indoor, Flash
Indoor, Natural Light
Indoor, Flash

Pure Ice Kiss Me Here is a medium grey creme. This would be my first grey polish. I was wanting to get China Glaze's Recycle but didn't want to go through the hassle of ordering online, so I went to Wal-Mart in search of a similar grey and I think this comes pretty close imo =). What do you think? At first I thought--should I get a grey polish or not? Looks like a boring color; but it actually looks pretty good on me (or so according to my husband. hehe) and I like it too...especially with the design on it =) Hope you like it too!

Base Coat: Nail Envy Dry and Brittle (Review coming soon)
Base Color: Pure Ice  Kiss Me Here
Konad IP m57 with Essie Licorice (lace);  Konad special polish in Pastel Violet (flowers)
Top Coat: Seche Vite

Have a great weekend!
♥, Kristine


Sunday, August 29, 2010

OPI DS Glamour IP m39

I've been on a blue streak lately I hope you don't mind. Whenever I buy polishes, for some odd reason, I tend to buy blue one way or another. It's not like I think it looks great on me or anything; I think I buy them because blue is just a pretty color period. So I need to at lease use my untried polishes and make use of them. It would be sad to seem them collect dust. Here's a quick mani for you:
Indoor, Flash

Base Coat: OPI Nail Envy
Base Color: None
Tips: OPI DS Glamour (French Chevron)
Konad IP m39 w/ Konad Special Polish in white
Top Coat: Seche Vite

Hope you liked it =)
♥, Kristine

Friday, August 27, 2010

OPI Ogre-the-top Blue with IP m71

Hi all! I'm finally back to stamping! After my son lost my konad stamper, I've been slacking in purchasing a new stamper but I finally got one here's what I used it for:
Indoor, Daylight
Indoor, Daylight

Base Coat: OPI Nail Envy
Base Color: OPI Ogre-the-top Blue
Konad IP m71 w/ OPI Yoga-ta get this blue
Embellished with rhinestones 

Enjoy =) Have an awesome weekend!

♥, Kristine

Wednesday, August 25, 2010

OPI DS Coronation striped pattern mani

I don't know what I was trying to achieve on this one but I think it turned out pretty good. Would you call this a striped pattern? I couldn't come up with a better name for it but anyway, this holographic beauty is from OPI's Designer Series called Coronation. A bright silver holo. I actually like it just at two coats where it's somewhat sheer but I went ahead and did three nice coats on this one.
Direct Sunlight
Outside, Shade
Direct Sunlight

Base Coat: OPI Nail Envy
Base Color: OPI DS Coronation
Nail Art: NYX INK nail art in Black
Top Coat: Seche Vite

♥, Kristine 

Monday, August 23, 2010

My Polish Rack

When I saw Manatee Mama's "comfy cosmetic corner" rigged with three home made polish racks, I was in awe! (All those pretty polishes o_O!) I NEED a polish rack or two for my growing collection of polishes. I didn't want to buy an acrylic one like they have in salons only because, well, i didn't want to spend money on something we can simply make. So I excitedly asked my hubby to make me one =). I contacted Manatee Mama and asked her for the dimensions for her polish racks and she responded with no problem. My hubby altered the original dimensions given due to spacing in our place. 


In case you'd like to make your own polish rack...
This rack measures 3'x2'
We used 3"x1" wood to make the entire shelf.
I have a little over 80/90 polishes and I still have room on the bottom for more =)
We used thick fishing line to secure polishes so in case of an earthquake, the polishes won't fall off. (or so we hope it won't ;))
The spacing between the shelves are about 5 inches apart.
Hubby working hard on making my polish rack ^_^. I love him =D!

We spent $0.00 for all the materials because my husband's parents own a construction business and we were able to gather extra wood that weren't being used. But according to Mama Manatee, it cost her around $30 to build all three of her polish racks. That's cheaper than one acrylic wall rack that'll cost between $17-$30!

I've had my polishes in shoe boxes, bins, drawers, and I always got frustrated because I could never keep it organize. I feel that having them on a rack best suits me so I can see what color I want to use next and being that it's out in the open, I always want to keep it nice and organized because it's prettier to look at.

How do you organize your polishes?
Do you have them in boxes? Bins? Drawers?
Would you prefer them on a rack or are you happy with the way you have you polishes organized?

Thanks for looking =)
♥, Kristine

Friday, August 20, 2010

Zoya Swatches Part 2

Here is part two of the swatches that I got from the Zoya Exchange. Enjoy!

Lexi - Meet Lexi, such a pretty color, a rosey/mauve almost metallic color with duochrome shimmer to it.

Mimi - here's a royal purple perfection with pinkish, purple micro glitter.

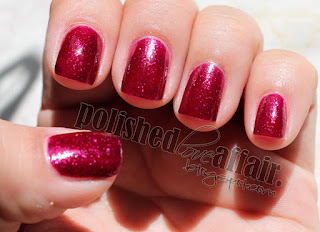
Nidhi - My favorite red of the haul. Pigmented red with gold micro glitter. I was able to achieve opacity in two coats.

Rea - As best described by Zoya, Rea is "a silvery, taupe-kissed mauve-purple in a metallic foil shimmer finish. An edgy purple steel shade that's unexpectedly gorgeous." 

Roxy - A purple base, red tone jelly with bright purple glitters. I love jellies and I love this color!

Trixie - a light metallic silver, shimmy foil finish. I got this one for konading. I haven't yet tried it for stamping but will sure let you all know how well it works.

Dovima - A matte black with silver shimmer. Something a little different for me; this is my first matte polish. I was definately not used to it as far as application goes because it dried super fast. Otherwise, I like the feel of matte on my nails and will definately buy more matte colors as they come along.

Overall, my experience with the Exchange was a breeze and I can't wait till they have another one! I loved all the colors I chose and I'm glad I got them as a start to my Zoya collection. I can't say much negativity on the quality of zoya polishes because they were great! IMO, zoya is now one of my fave brands of polishes. Thanks for looking!

♥, Kristine

Thursday, August 19, 2010

Zoya Swatches Part 1

Finally! I got around to swatching all of my zoya from the Zoya Exchage they had a few months ago. Kinda late, I know, but at least it's here. Here are 8 out of the 15 that I got from the exchange.
 
Aria - Rose color with gold glass flecked sparkle.

Beyonnce - I got this one because of it's name regardless the color. Gotta love Beyonce! A bright coppery/bronzy reddish pink color. It was a fun color to wear.
 
Alegra- A bright pink fuchsia with pink glitters.

Bridgit - Beige, skintone with slight shimmer. This was a subtle nude color on me. It looked clean, like fresh manicure.


Charla - A medium bluish green/ teal sparkle. Such a pretty color! Removing this one was a pain! You're left with blue fingers!

Ivanka - A green with blue flash glitter. I don't think green is great on me, but I really liked this color.

Kotori - A black base with blue micro-fine glitter. A dark dusty blue color. I love this!
Thanks for looking! Stay tuned for part 2 of this haul. 

♥, Kristine